Side Dishes
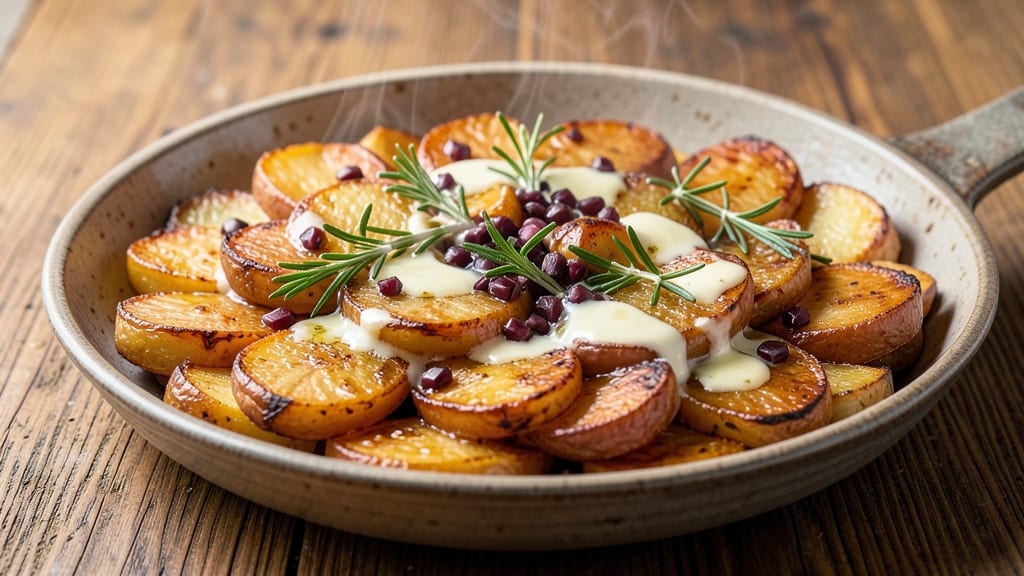
This stovetop potatoes recipe transforms humble spuds into crispy, herb-infused crowns in just 20 minutes—no oven required. The secret lies in a precise cooking technique that creates golden, caramelized edges while keeping the insides tender and fluffy.
I developed this method after years of testing different stovetop approaches, and it consistently delivers restaurant-quality results without the wait.
The process starts with evenly sized potato slices that cook uniformly, then a quick sear in a hot pan with butter and aromatics. Fresh herbs like rosemary and thyme infuse the potatoes with bright, earthy flavor while the butter adds richness.
The key is patience during the final crisping phase—this is where those coveted golden crowns form, giving you a texture that’s crisp on the outside yet pillowy within.
By the time you plate these potatoes, you’ll have a side dish that looks and tastes like it belongs on a fine-dining menu. The aromatic herbs release their fragrance with every bite, while the caramelized edges add a satisfying crunch.
They pair beautifully with grilled meats, roasted vegetables, or even as a standalone dish with a drizzle of olive oil and flaky salt.
This recipe is designed for efficiency without sacrificing flavor—ideal for weeknight dinners or when you need a quick but impressive side. The ingredients are simple, the technique is straightforward, and the results are consistently delicious. Let’s get started on creating your perfect stovetop potatoes.
Ingredients for stovetop potato
Nine simple ingredients transform basic potatoes into restaurant-worthy crisp crowns.
| Ingredient | Amount | Notes |
|---|---|---|
| Russet Potatoes 🥔 | 2 lb | Cut into 1/4-inch slices, uniform thickness |
| Unsalted Butter 🧈 | ½ cup | European-style preferred, cold for crisping |
| Fresh Rosemary 🌿 | ¼ cup | Finely chopped, stems removed |
| Fresh Thyme 🌿 | 1 tbsp | Leaves only, stems discarded |
| Garlic Cloves 🧄 | 4 cloves | Thinly sliced, skin removed |
| Extra-Virgin Olive Oil 🫒 | 2 tbsp | Light fruity variety for balance |
| Diamond Crystal Kosher Salt 🧂 | 1 ½ tsp | Fine grain for even seasoning |
| Black Peppercorns 🌶️ | ½ tsp | Freshly cracked for aroma |
| Flaky Sea Salt 🧂 | 1 tbsp | For finishing, Maldon preferred |
| Lemon Zest 🍋 | 1 tsp | Brightens herb flavors |
Russets are your best bet here—their low moisture content and fluffy texture make them perfect for stovetop crisping. Buy them fresh (the skin should be firm and free of sprouts) from a well-stocked grocery store like Whole Foods or Trader Joe's. If you can't find Russets, Yukon Golds work in a pinch, but they'll be slightly less crisp. For the herbs, fresh is non-negotiable—dried won't give you that bright, aromatic punch. I always grab extra rosemary because it's my favorite, and it keeps well in the fridge for up to 2 weeks wrapped in damp paper towels.
No fresh rosemary? Fresh marjoram or even thyme leaves can step in, though the flavor will differ slightly. Running out of butter? Olive oil works but won't give you that rich, golden crust. For the garlic, roasted garlic paste is a sneaky shortcut if you're in a hurry. The kosher salt is crucial—it dissolves evenly and enhances the potatoes' natural sweetness. If you only have table salt, use half the amount. As for the lemon zest, a splash of lemon juice works in a bind, but zest adds that bright, citrusy pop that makes these potatoes feel special.
Store your sliced potatoes in cold water in the fridge for up to 8 hours before cooking—they'll stay crisp and won't oxidize. The herbs? Keep them in a sealed container with a damp paper towel for 5-7 days. These potatoes reheat beautifully—just pop them in a skillet with a pat of butter for 3-4 minutes until crispy again. They're even better the next day, so make extra if you can. For leftovers, store them in an airtight container for 3-4 days—though honestly, they rarely last that long.
Why You'll Love This Recipe
- One-Pot Magic: I swear by this recipe when I’m drowning in dishes—just chop, pan, and forget about it. No oven preheating, no extra bowls, and that golden crust forms right on the stovetop while I’m stirring something else.
- Herb Bomb Flavor: The rosemary and thyme practically melt into the butter, while the garlic cloves caramelize just enough to add this deep, savory punch. It’s the kind of dish where every bite makes you pause and think, “How is this so good?”
- Weeknight to Dinner Party: Same recipe, different vibes—serve it with a fried egg for lazy mornings or pile it high on a platter for a cozy gathering. The potatoes hold up perfectly, so I never stress about timing or seconds.
- Budget-Friendly Leftovers: Russets are cheap, butter stretches far, and these potatoes reheat like a dream. Honestly, I make a big batch on Sundays and eat them all week—no sad, dry reheats here, just crispy edges every time.
Step-by-step instructions for herb-infused crisp crowns
Here's how to transform simple russet potatoes into golden, herb-kissed crowns with perfect texture every time.
Prep the Potatoes for Maximum Crispiness
Start by slicing the 2 lb russet potatoes into ¼-inch thick rounds using a mandoline or sharp knife. I like to keep them uniform so they cook evenly. Place the slices in a single layer on paper towels and pat them completely dry—this is non-negotiable for crispy results. Wet potatoes steam instead of crisp, so take your time here. Arrange them on a baking sheet and let them air-dry for 10 minutes while you prep the herbs.
The reason we dry them so thoroughly is that moisture prevents the Maillard reaction—the chemical process that creates that beautiful golden crust. You'll know you've done it right when the potato slices look matte and dry to the touch. This step alone makes the difference between soggy and spectacular.
Build the Herb Butter Base
In a small saucepan, melt the ½ cup unsalted butter over low heat until just liquid. Remove from heat and stir in the ¼ cup finely chopped fresh rosemary, 1 tablespoon fresh thyme leaves, and 4 thinly sliced garlic cloves. Let this mixture steep for 5 minutes while you heat your skillet. The herbs will infuse the butter with their aromatic oils, creating layers of flavor.
While the butter infuses, heat a 12-inch cast-iron skillet over medium-high heat until it's smoking hot. This high heat is crucial for developing that crispy crust. Add 2 tablespoons extra-virgin olive oil and let it shimmer for 30 seconds before adding the potatoes. The oil should be hot enough that a drop of water sizzles dramatically when flicked into the pan.
Cook in Batches for Perfect Crispiness
Working in batches of 6-8 slices, carefully arrange the potato rounds in the skillet without overcrowding. Press down gently with a metal spatula to ensure even contact with the hot surface. Cook for 3-4 minutes per side until they develop golden brown spots and crisp edges. You'll know they're ready when they release easily from the pan and have developed a caramelized crust.
As you cook each batch, transfer the finished potatoes to a paper towel-lined plate to drain excess fat. The residual heat will keep them warm while you finish the remaining slices. Don't be tempted to flip too soon—wait until you see those golden brown spots form before turning. This is where the magic happens, creating that perfect balance of crispy exterior and tender interior.
Finish with Herb Butter and Seasoning
Return all the cooked potatoes to the skillet and pour the herb-infused butter over them. Toss gently to coat each slice evenly with the fragrant butter. Sprinkle with 1½ teaspoons diamond crystal kosher salt and ½ teaspoon freshly cracked black peppercorns, then add the 1 teaspoon lemon zest. The citrus brightens the earthy herb flavors and adds a subtle tang that cuts through the richness.
Let the potatoes cook for another 1-2 minutes until everything is heated through and the butter has melted completely into a glossy coating. The lemon zest will sizzle slightly in the hot pan, releasing its oils and intensifying its flavor. Taste one and adjust seasoning if needed—this is your chance to perfect the balance before serving.
Create the Crisp Crowns and Serve
Working quickly, use a metal spatula to stack 4-5 potato slices together in a loose pile, pressing gently to form a crown shape. The heat from the pan will keep them warm while you assemble. Repeat with the remaining potatoes, creating 4-5 crowns total depending on your plate size. The key is to work fast so they don't cool before serving.
Transfer the crowns to serving plates and immediately sprinkle with 1 tablespoon flaky sea salt. This final touch adds a delicate crunch and visual appeal that elevates the dish from good to restaurant-quality. Serve immediately while the potatoes are still warm and crisp. The crowns should hold their shape when lifted, with crispy edges that give way to tender, herb-infused centers.
Pro Tips For Making Stovetop Potato
- CUT THEM EVENLY: Russets are stubborn—uneven slices mean some burn while others stay raw. Use a mandoline or sharp knife to slice them 1/4-inch thick, then soak in cold water for 10 minutes to wash off starch. (Yes, even if you’re impatient like me.)
- MELT BUTTER LOW: After browning the garlic, pull the pan off heat to melt the butter—high heat burns it fast. Let it simmer gently for 2 minutes, stirring constantly, until it’s just liquid gold. (Your future self will notice the difference.)
- SALT THE POTATOES: Toss the sliced potatoes with 1 tsp kosher salt before cooking—it seasons the flesh and crisps the edges better. Skip this, and you’ll end up chasing flavor with extra butter later.
- STIR LIKE YOU MEAN IT: The first 3 minutes are critical—stir every 30 seconds to avoid sticking. After that, let them crisp for 5 minutes undisturbed. (I learned this the hard way—burned batches taste like regret.)
Creative variations of this dish
Garlic-Herb Potato Twists
Swap the crowns for garlic-herb potato twists by cutting potatoes into ¼-inch thick sticks instead of rounds. Toss them with 1 tbsp olive oil, 1 tsp garlic powder, and ½ tsp smoked paprika before crisping in the skillet.
The sticks cook faster—just 2-3 minutes per side—and hold their shape beautifully when stacked. Finish with a sprinkle of parmesan cheese for extra richness. 🌿
Spicy Cajun Potato Crowns
Add Cajun heat by mixing 1 tbsp Cajun seasoning (like Tony Chachere’s) with the kosher salt before tossing the potatoes. For extra kick, stir ½ tsp cayenne pepper into the herb butter.
The spices caramelize beautifully, creating a bold, smoky crust that pairs perfectly with grilled shrimp or blackened chicken. Serve with a side of cooling avocado crema to balance the heat. 🌶️
Cheesy Potato Stacks
Take these crowns to the next level by adding shredded Gruyère or sharp cheddar between the potato layers. Sprinkle ¼ cup cheese over the potatoes before the final 1-2 minutes of cooking—it’ll melt into a gooey, golden blanket.
For extra decadence, top with crispy fried shallots and a drizzle of truffle oil before serving. These stacks are irresistible as a standalone dish or alongside steak. 🧀
Sweet Potato Adaptation
Swap russets for orange-fleshed sweet potatoes and adjust the seasoning to 1 tsp cinnamon, ½ tsp nutmeg, and 1 tbsp maple syrup in the butter. The natural sweetness of the sweet potatoes caramelizes beautifully, creating a warm, spiced crust that’s perfect for fall.
Garnish with toasted pecans and a sprinkle of flaky sea salt for contrast. 🍠
Lemon-Pepper Potato Towers
Brighten things up with a lemon-pepper twist—skip the rosemary and thyme, and infuse the butter with 1 tbsp lemon zest and 1 tsp cracked black peppercorns. Add 1 tbsp fresh parsley at the end for a pop of color.
These towers are light yet flavorful, making them ideal for spring or summer meals. Pair with grilled fish or a fresh cucumber salad for a refreshing combo. 🍋
Breakfast Potato Hash
Turn these crowns into a breakfast hash by adding 2 tbsp chopped chives, 1 tbsp crumbled feta, and a fried egg on top. Cook the potatoes as directed, then transfer to a skillet with the egg.
The egg yolk will soak into the crispy potatoes, creating a rich, savory breakfast in minutes. Serve with sourdough toast for dipping. 🍳
Nutrition facts
Frequently asked questions
Can I use any type of potato for this stovetop method?
Russet potatoes are ideal because their low moisture content and fluffy texture create the perfect crispy exterior while staying tender inside. Yukon Golds work in a pinch but won't be as crisp. Avoid waxy potatoes like red or new potatoes—they'll turn mushy instead of golden.
Why do my stovetop potatoes turn out soggy instead of crispy?
Wet potatoes are the #1 culprit! Always pat slices dry with paper towels and let them air-dry for 10 minutes before cooking. Overcrowding the pan also steams instead of crisps—work in batches of 6-8 slices for even browning.
How do I make these potatoes ahead of time?
Cook the potatoes as directed, then store them in an airtight container for 3-4 days. Reheat in a skillet with 1 tbsp butter for 3-4 minutes until crispy again. For the crown presentation, assemble just before serving to maintain texture.
What's the best way to serve these herb potatoes?
These crisp crowns pair beautifully with grilled meats, roasted vegetables, or even as a standalone dish. For extra flair, drizzle with olive oil and serve with a side of garlic aioli or sour cream. They also make a stunning vegetarian main course with a fresh salad.
Can I make this recipe in a nonstick pan?
While possible, cast iron or stainless steel works best for that perfect crispy crust. If using nonstick, reduce heat slightly to medium and add 1 extra tbsp olive oil to prevent sticking. The texture won't be quite as crispy, but it'll still be delicious.